My Take On Run-time Compiled C++

Hot loading of C++ code during run-time has become a popular technique among game programmers. The motivation for this type of techniques is to shorten the code-compile-verify iteration. If this cycle starts taking too long, all kinds of negative effects can set in (frustration, boredom, disengagement) and productivity goes down rapidly.

With any sufficiently large code base, there are two main contributing factors to the unproductive portion of this cycle:

  • Compilation time – even a small change in code may trigger lengthy recompilation.
  • Program state – loading data and calculating complex program state can take a long time. It can be wasteful, having to exit the program, throw away its state, start fresh and try to replicate the previous state, only because of a tweak in code.

Traditionally, the go-to solution has been to integrate a scripting language. Without going into much detail, suffice to say this brings a host of new problems: adding a large-ish software dependency, need to write or generate interop code, incompatibilities between the native and scripting language concepts, performance, etc. While traditional scripting is certainly a good choice in many cases, alternatives have popped up, such as visual node graph editors (think Unreal Blueprints).

The idea of using C++ as both native language and scripting language is not new and its advantages have been discussed plenty. Some interesting projects (that I know of) approach this quite differently:

  • Cling – interactive C++ interpreter and REPL built on LLVM and Clang. Cling can be used either standalone or embedded in a host program.
  • Live++ – run-time hot reloading solution. It can recompile a program or library and hot-patch it in memory while it’s running.

In contrast with those sophisticated tools, there is another simple but effective solution: compile a C++ script into a shared object (DLL) then load it in the host process and execute. This approach has been explored many times [1, 2, 3, 4, and others]. However, I think those attempts were sometimes over engineered. Their authors created small frameworks with lots of features and restrictions, and sometimes tried to force C++ to be something which it’s not — a real scripting language. But we only use it here as if it was a scripting language. I thought I could do with something much simpler to fulfill my requirement:

While not having to exit my program and throw away its state, I want to compile and run some additional C++ code and allow it to fiddle with my program’s state.

Conceptually and practically, the code to achieve this does not have to be complicated. Here is a fully functional minimal version of this technique in C:

void rt_execute(void *context) {
    system("g++ -shared -o script.so script.cpp");
    void *h = dlopen("./script.so", RTLD_LAZY);
    void (*entry_fn)(void*) = dlsym(h, "entry_fn");
    entry_fn(context);
    // perhaps later: dlclose(h);
}

Any features on top of that (save for error checking, obviously) would be just added convenience. For example, we could implement a build environment and compiler switches manager. Or watch for changes in the script file and automatically recompile and reload. I think, there is especially no need for any complex data exchange mechanism — something that was explored quite diligently by previous attempts. Let’s just put any shared data structures into a common header and simply include it from the script. Then simply pass a pointer to this structure from the host application to the script. What is behind this pointer, is entirely up to the user. It can be nothing, or it can be a whole game engine with many complex subsystems and interfaces.

So I made my own Run-time Compiled C++ library, with minimal features and maximum flexibility. It’s available on GitHub: https://github.com/martinky/qt-interactive-coding. The library is made using Qt. Why Qt? Because Qt is my go-to framework when I need C++ with batteries. I’ll be using the library in my other Qt projects. And last but not least: Qt comes with its own cross-platform build system – qmake. By taking advantage of qmake, the library automatically works on multiple platforms, as I don’t have to deal with various compilers directly.

With this simple approach, there aren’t really any restrictions on what can or cannot go into a C++ script. However, we have to keep in mind that the script code is loaded and dynamically linked at run-time and there are some natural consequences of this. These are familiar to anyone who has made a plugin system before:

  1. We are loading and executing unsafe, untested, native code. There are a million ways how to shoot yourself in the foot with this. Let’s just accept that we can bring the host program down any time. This technique is intended for development only. It should not be used in production or situations where you can’t afford to lose data.
  2. Make sure that both the host program and the script code are compiled in a binary compatible manner: using the same toolchain, same build options, and if they share any libraries, be sure that both link the same version of those libraries. Failing to do so is an invitation to undefined behavior and crashes.
  3. You need to be aware of object lifetime and ownership when sharing data between the host program and a script. At some point, the library that contains script code will be unloaded – its code and data unmapped from the host process address space. If the host program accesses this data or code after it has been unloaded, it will result in a segfault. Typically, a strange crash just before the program exits is indicative of an object lifetime issue.

Building Qt apps for Windows XP in 2018

Windows XP has been discontinued and unsupported both by Microsoft and The Qt Company for a long time now. However, in 2018 its install base is still significant, at around 6% of all desktop PC machines. Chances are your customers will require that your product runs on Windows XP, too.

If you are in this predicament, you have several options:

  1. Go with MSVC 2017 and use Windows XP targetting. You’ll need to compile Qt SDK on your own, which might be an issue: Qt 4 does not officially support newer MSVC compilers and Qt 5 is dropping Windows XP support.
  2. Go with VC 2010, Windows 7.1A SDK and Qt 4.8.x which is the last pre-built SDK that supports this platform. You’ll be stuck with Qt 4, but hey, you are already stuck with Windows XP to begin with.
  3. Go with MinGW. You could even build on Linux and cross-compile to Windows.

In hindsight, probably the MinGW way would be the easiest, but when targeting Windows, I prefer the native MS compilers, so I chose to go with option #2.

Let’s go:

  • Get a Windows 7/8/10 machine, ideally separate machine or a VM, so you potentially don’t mess up your workstation.
  • Download and install Windows 7 SDK, which contains the VC 2010 compilers. If you get errors from the SDK installer, see this and this. Uninstalling VC 2010 Redistributable before installing the SDK should fix this.
  • Download and install Update for the MSVC 2010 compilers, because due to a bug in the MS SDK installer they are not installed if you are on a Windows 10 machine. This will get you the compilers in a standalone installer that should work.
  • Download and install the latest Qt 4 SDK release for VS 2010.

If everything installed properly, even with the mentioned issues, you should have a working build environment that is capable of targeting Windows XP. Now let’s build something:

%QTDIR%\bin\qtvars.bat
"C:\Program Files\Microsoft SDKs\Windows\v7.1\bin\SetEnv.cmd" /x86 /xp /release
qmake <source_dir>/project.pro
nmake

Hopefully the build went OK and you can deploy to your Windows XP customers. In my case however, the build ended up in error – the compiler failed to find several includes: ammintrin.hinttypes.h and stdint.h. I fixed this by simply “stealing” these files from another installation of VS2012 and copied them over to the VS2010 install dir: to c:\Program Files (x86)\Microsoft Visual Studio 10.0\VC\include\.

Can QML become the next standard for web UI?

Recently, I came across a few articles [1, 2, 3] comparing Qt’s modern UI framework – Qt Quick and its own declarative language QML to HTML, with QML coming out as a clear winner in several categories:

  • speed of learning,
  • ease of use,
  • performance,
  • cross-platform compatibility.

Although QML is not a substitute for HTML – they were designed with different goals in mind – I think QML would make a great web technology.

No matter which client framework is currently in fashion, building an UI on top of HTML is using the wrong abstraction for the wrong purpose. HTML was originally created as hyper-text markup language. Its primary function is to semantically structure and link text documents. Presentation was largely left to the user agent (browser). The user could even configure certain aspects like fonts or colors. Over time, more presentation control mechanisms were added. Today’s HTML, CSS, DOM and JS scripting is a weird mix of text markup, presentation and behavior. With every browser implementing its own subset, in its own way, with its own quirks, the requirement to create documents that look and behave consistently across browsers and platforms quickly becomes untenable.

With HTML 5, presentation consistency could be achieved more easily: instead of manipulating the DOM, we can write our own presentation code using Canvas and its imperative graphics API. We can go even more low-level with WebGL. In this case, HTML is not really in use anymore – it serves only as a container in which the Canvas element is embedded. Whether we write our own rendering code or use a Canvas based library, it’s hard to get it right. More often than not, Canvas-heavy websites generate excessively high CPU load.

In contrast, QML was designed from the ground up for modern, fluid, data-driven UIs. At its core is a declarative component-based language with dynamic data bindings and powerful animation and state management system. The language is complemented by a comprehensive library of UI primitves, called Qt Quick, with well defined properties and behaviors. A QML document describes a tree of visual (and non-visual) elements that form a scene. With data bindings being a core concept, the separation of data from presentation is trivial and encouraged. The scene is controlled by any combination of the following mechanisms:

  • a data model hooked into the scene using data bindings,
  • reactions to events from user input, sensors, location and other APIs,
  • JavaScript code for imperative programming.

A QML document defines a scene completely and precisely. You can think of it as pure presentation. Nothing is left to interpretation for the runtime. It will look and behave identically on all platforms and devices. Due to the declarative nature of the language, it is easy to imagine what the scene will look like by reading the source code.

Under the hood, QML uses a scenegraph engine implemented on top of whatever low level graphics API is available on the platform: currently OpenGL and OpenGL ES on embedded platforms, with Vulkan and D3D12 backends in the works. The engine uses modern programmable graphics hardware and is heavily optimized and CPU efficient, only redrawing the scene when needed.

It is obvious that QML and Qt Quick would be a great fit for the web. I wish browsers already supported it as standard. The big question is: what is the chance of big browsers implementing QML? Unlike HTML, which is an open standard, QML (although open-source) is a proprietary technology owned and developed by the The Qt Company. It would probably have to be developed into an open standard and in partnership with major browser vendors. I don’t know if this is going to happen anytime soon, or ever. Realizing they are missing out on the biggest platform – the world wide web – The Qt Company might want to invest in this direction. It would be a win for everybody and most certainly web developers.

Update (6/2018): It looks like Qt is going to support the WebAssembly platform, so QML in your browser might be a reality soon. Sure there are rough edges right now and the performance is not great either. Let’s see where this goes.

Resources:

  1. https://www.developereconomics.com/cross-platform-apps-qt-vs-html5
  2. https://v-play.net/competitor-comparisons/qt-vs-html5-cross-platform-apps
  3. http://blog.qt.io/blog/2017/07/28/qml-vs-html5/

Discussion:

  1. https://news.ycombinator.com/item?id=14894937

Native Windows build jobs on Jenkins

This may not be the most frequent use case, but Jenkins CI server is perfectly capable of running native C/C++ build jobs on Windows. That is, build jobs that use the native platform’s tools, i.e. Visual Studio or possibly other C/C++ compiler suite.

From the user’s perspective, building is a straightforward activity:

  • Launch Visual Studio Command Prompt, aka. vcvarsall.bat.
  • Navigate to your source and invoke MSBuild on the solution,
  • or nmake if you are hardcore and use Makefiles.
    • If you are using a third-party build system such as CMake or Qt’s qmake, you first run that to generate the Makefile.

This translates pretty well into a Freestyle Jenkins build job. You could put all the above mentioned steps into a single Windows batch command build step. But you may prefer one of Jenkins’ plugins for the build system of choice, as these provide a nicer interface than a plain batch file and sometimes more options and allow crazy build scenarios*.

The trouble with Jenkins build plugins is they don’t provide a way to setup the environment for the native build tools, i.e. they don’t call vcvarsall.bat. Now you cannot just add a pre-build step and call vcvarsall.bat in it. That would only setup the environment inside the pre-build step. As each build step starts with a fresh environment, the main build step will be unaffected by it. One option is to run vcvarsall.bat for the logged-in user and also run Jenkins under this user. But that would be severely limiting. What if you want to run one 32-bit build job and another 64-bit job? Also this approach will not work if you run Jenkins as a Service.

Fortunately there is a simple way to apply the effect of vcvarsall.bat over the whole build job. After all, vcvarsall.bat only sets some environment variables – a whole lot of them. This neat little trick uses the EnvInject Jenkins Plugin to record the env variables set by vcvarsall.bat (and possibly other environment setup scripts you may use) and apply them to the whole build job.

  • Check the “Prepare an environment for the run” option.
  • In the “Script content” enter something like this:
"C:\Program Files (x86)\Microsoft Visual Studio 12.0\VC\vcvarsall.bat" x86
"C:\Qt\5.5\msvc2013\bin\qtenv2.bat"
set SOME_OTHER_VAR=foo
set > C:\jenkins\workspace\my-build-job-env.properties
  • The last line “set > …” saves all the environment variables set by the previous scripts to the given file.
  • Enter this file name into the “Properties File Path” field.

And voila, the build environment is set for the entire build job.


*) In our specific case, which I admit is a little bit unusual we use Maven as the topmost build tool. This build workflow has been adapted from the Java world and works surprisingly well in the C++ world, too. Maven provides packaging and versioning facility (for which there is no cross-platform standard in the C++ world at this time). Maven’s pom.xml invokes Ant’s build.xml, which describes the build steps in concrete terms. Ant invokes qmake, then nmake and optionally other tools such as Doxygen and finally zips the output to a neat self-contained package. The resulting zip package is attached as Maven artifact and deployed to the client’s Nexus server. Additionally unit tests are run (also as a Maven build phase) and test results are published and visualized by Jenkins.

Sources:

  1. http://stackoverflow.com/questions/10625259/how-to-set-environment-variables-in-jenkins

OneDrive for Business as Unsynced Storage or Backup

If you happen to have an Office 365 subscription you may have noticed that it comes with a 1 TB (1024 GB) OneDrive for Business cloud storage. If you are thinking that this may be a nice place to offload larger files or backups then read on…

There are several ways OneDrive can be used. The most obvious and convenient way is to copy files into the OneDrive folder on your machine and let them sync to the cloud in the background. However this does not serve our purpose very well because a local copy stays on the local machine. Furthermore, if we have linked other machines with the same account these files will be duplicated on those machines as well. What we actually want to do in this article, is to upload files to the cloud and remove them from local machine.

Notice the two OneDrive folders. The first one is the default that comes with the Microsoft Account (if you use one to log into your Windows). The second one is installed with the Office 365 suite and used with your Office 365 for Business organization account. These two accounts are not connected in any way and lead to completely separate and disconnected universes that have nothing in common. Well, except the common creator and provider of both services. Let me put it in another way: Microsoft Account is the key to all things Windows including Windows Store apps. Office 365 account is the key to all things Office. The sooner you realize the distinction, the more head scratching it will save you.

OneDrive and OneDrive for Business.

Alternatively, you can upload individual files of up to 2 GB in size using the web interface. However, changes done using the web interface are also automatically synced to all linked machines. On Dropbox (or, for that matter, also the consumer flavor of OneDrive) you can select individual subdirectories that will or will not be synced. With OneDrive for Business either the whole OneDrive directory will sync or nothing. Until Microsoft improves the OneDrive for Business client, I will show how to create an unsynchronized storage space on OneDrive for Business.

What is a Document Library

The Business flavor of OneDrive is built on top of a technology called SharePoint. As an Office 365 Business subscriber you also have an access to something called a SharePoint Site. On your Site, OneDrive content is stored in what is called a Document Library. The underlying technology is so complex, you would need a certified MS consultant to explain it to you. But the point is, we can have multiple Document Libraries and each library can be synced separately. Your default Document Library called “Documents” is created for you and this is the default OneDrive location that will be synced when you set up OneDrive for Business on your machine. To manage your libraries, sign in to your Office 365 Portal, navigate to OneDrive and chose Site contents under the “gear” icon in the toolbar.

onedrive-2

Adding a new Document Library is easy – click on add an app, select Document Library, enter a name for the new library (I called mine “BigData”) and click Create. Once you closed your browser, navigating back to your new OneDrive storage is a bit tricky. Clicking on OneDrive button in the main menu will take you to your default “Documents” library. You’ll have to go through that “gear” icon -> Site content -> Your Library. The new library will not be synced to any machines. In the next section I describe various ways how to use this new library.

Option 1 – Browser

Once you are logged in to your Office 365 Portal, the most straightforward way to use your new Document Library is directly through the browser. Navigate to your library as described above, upload / download / manage the content directly from the browser.

This has the advantage, that once you upload a file, you can delete it from your machine and the file stays in the cloud. Uploading large files through the browser is  not very convenient. The upload breaks if you close the browser or your connection is interrupted.

Option 2 – Sync the Library

You can sync the new library to a directory on your machine, just like the default library of OneDrive. You’ll need the URL of the new library: navigate to your library, in the LIBRARY ribbon toolbar select Library Settings, copy the URL presented at the top of the page (not the URL in the browser address bar). Now right click on the blue OneDrive for Business system tray icon and select Sync a new library. Paste the URL in the dialog, press Sync Now. A new cloud-synchronized directory will be created on your hard drive.

This is the classic sync scenario. Everything copied to the synchronized directory is duplicated in the cloud and everything in the cloud is copied back to this directory. This way, files from the cloud are also available offline.

Option 3 – Map Network Drive

The new document library can also be mapped as a network drive. Good step-by-step guide is here.

This way, your files stored in the cloud will be accessible through the file system (the mapped drive letter) but without duplicating them on your local hard drive. Files on the cloud are only available as long as you are online.

However, I found that copying new files to the mapped drive temporarily makes a copy of those files on the local hard drive. The copy remains there until the files are finished uploading to the cloud.

Option 4 – Specialized 3rd Party Cloud Storage Client

3rd party cloud storage client software (e.g. CloudBerry) can provide many more features such as: end-to-end encryption, resumable upload and download, multiple cloud storage backends and overcoming various limitations of those backends.

Unfortunately I am not aware of any solid 3rd party client software for the SharePoint-based OneDrive for Business. I would be grateful for any suggestions.

Sharing

OneDrive for Business has a sharing feature which works best if you are going to share with other Office 365 users. Anonymous public sharing using a web link is limited to individual files, i.e. for each file you want to share you have to obtain a separate share link. You can’t send someone a public link to a whole directory.

C++ Member Initializer List Fallacy a.k.a. Wreorder

There is no question that C++ is an extremely complex programming language with a lot of traps that can catch even the most hardened coders by surprise.

One of my favorite language features that can bring a headache is the constructor member initializer list. Personally, I try not to use this feature unless necessary. But if you need to initialize a member of a reference type or a class type using a non-default constructor, this is your only choice. And that is when you open your code to a category of easy to introduce – hard to spot bugs.

Have you ever changed the order class members during routine refactoring? Touched only the header file and didn’t bother to look into the .cpp? Then you probably didn’t know about this.

Consider the following demonstration:

[gist https://gist.github.com/martinky/b13f1db0c750cdcf9365 /]

Looks perfectly normal, right? Especially if the class declaration and constructor implementation were separated into a header file and a .cpp source file. The order in which you write member initializers is completely irrelevant, only the member declaration order matters.

Now that is pretty logical and consistent. Looking at a class definition, one would expect that members are initialized in the order in which they are declared. But one tends to forget this rule when looking at a constructor implementation and the initializer list. Especially if this is in another file. Also consider destruction: members are destructed in the reverse order of their construction. If two constructors of would construct the class members in two different orders, in which order should the destructor destroy them?

In the example code above, the comp.a variable is initialized using an undefined value, which makes it effectively an uninitialized variable and therefore undefined behavior.

I don’t understand why C++ allows to write member initializers in different order, especially if it leads to such nasty bugs. In my opinion, this should be a hard compile error. Even worse, compilers are completely silent about it. At least by default.

Clang and g++ will only throw a warning when run with the -Wreorder or -Wall option.

The Visual C++ compiler (cl) is completely silent. It does not notice this bug even when using the highest warning level /W4, /Wall, not even using the venerated /analyze option!

Conclusion

Do not rely on your favorite compiler. Try to push your code through as many compilers as you can. Strive to get your code free of warnings on the highest warning levels on all of them. Add a static code analyzer to your arsenal. Preferably not just one, but as many as you can get your hands on. C++ developers who are locked to a single platform are at an inherent disadvantage because they might get deprived of quality tools that are available on other platforms.

Speed up C++ build times by means of parallel compilation

Everyone who has worked on a fair-sized C/C++ project surely knows these scenarios: sometimes it’s unavoidable to change or introduce a new #define or declaration that is used nearly everywhere. When you hit the ‘Build’ button next time, you’ll end up recompiling nearly the whole thing. Or you just came to the office, updated your working copy and want to start the day with a clean build.

The complexity of the C++ language in combination with the preprocessor makes compilation orders of magnitude slower, compared to modern languages such as C#. Precompiled headers help here a bit, but it’s not a solution to the problem inherent to the language itself, only a mere optimization. There are coding practices that help a lot, not only in making robust and maintainable software, but also helping to improve build times. They go along the way of “minimize dependencies between modules” or “#include only what you use directly”. There are also tools that visualize #include trees and help you identify hot-spots. These are all clever tricks, which I may discuss later. However, this article is about raw, brute force :) You just got a new, powerful, N-core workstation? Well, let’s get those cores busy…

C++ translation units (.cpp files) are independent during the compilation phase and indeed are compiled in isolation. Therefore, the speed of compilation scales almost linearly with the number of processors. Most IDEs and build tools nowadays come with an option to enable parallel compilation. However, this option is almost never enabled by default. I will show you how to enable parallel compilation in build systems with which I have some experience:

  • Makefiles (Linux and Windows)
  • Qt’s Qtcreator IDE (Linux and Windows)
  • MS Visual Studio, MSBuild

Makefiles – gnu make

Telling the make program to compile in parallel could not be simpler. Just specify the -j N (or –jobs=N) option when calling make, where N is the number of things you want make to run in parallel. Good choice is to use the number of CPU cores as N. Warning: if you use -j but do not specify N, make will spawn as many parallel jobs as there are targets in the Makefile. This is neither efficient nor desirable.

Makefiles on Windows – nmake, jom

On Windows, Visual Studio comes with its own version of the make program called nmake.exe. Nmake does not know the -j option and can’t do parallel jobs. Luckily, thanks to the Qt community, there is an open source program called “jom”, which is compatible with nmake and adds the -j option. You can download the source and binary from here: http://qt.gitorious.org/qt-labs/jom. Installation is very simple, just extract the .zip file anywhere, optionally add it to %PATH%. Use it like you would use nmake.

Qt’s Qtcreator

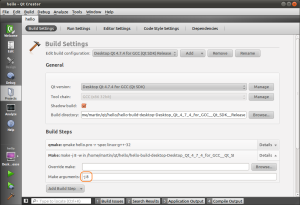
First, let me say that Qtcreator is a very promising cross-platform IDE for (not only Qt) C++ projects, completely free and open source. Not surprisingly, Qtcreator uses the Qt’s qmake build tool first to generate a Makefile from a project description .pro file. Then it simply runs make on the generated Makefile. Qtcreator allows you to pass additional arguments to the build commands: Projects -> Build Settings -> Build Steps -> Make -> Make arguments: here you can specify the -j N option.

Project build settings in Qtcreator on Linux.

Qtcreator on Windows

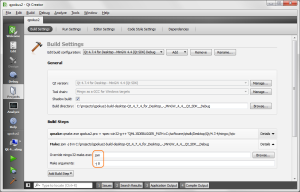
If you use Qtcreator on Windows, the story is almost the same with only minor differences. On Windows platforms Qtcreator uses the MinGW32 build toolchain. Unfortunately due to the way (bug) MinGW’s make works on Windows and the way Qt’s qmake generates Makefiles, the -j option doesn’t work. The reason why and various workarounds are described in this discussion. One easy way is to override the mingw32-make.exe and use jom.exe instead.

Project build settings in Qtcreator on Windows.

MS Visual Studio, MSBuild

Not surprisingly, the Visual Studio/C++ IDE uses a completely different build system than the GNU toolchain, called MSBuild (formerly VCBuild). If you only work within the IDE and do not wander into the command line world very often, you probably haven’t even bumped into this tool. Yet it is invoked behind the scenes whenever you press the build button. In short, the process is as follows: Visual Studio keeps the list of project source files, compiler and linker options in a .vc(x)proj file. At the start of each build, the MSBuild tool then crunches the .vcxproj file and outputs a list of commands for invoking the compiler, the linker and any other tools involved in the build process.

The MS Visual C++ compiler (cl) can compile multiple source files in parallel, if you tell it to using the /MP switch. It will then spawn as many parallel processes as there are installed CPU cores in the system. You can set this option conveniently from the IDE: Project -> Properties -> Configuration Properties -> C/C++ -> General -> Multi-processor Compilation: Yes (/MP). This option will be saved into the .vcxproj file, so multi-process compilation will be used regardless if you build in the IDE or from the command line.

Enable parallel compilation for a MSVC project.

Multiple simultaneous builds

In Visual Studio, you can go even a little further and tell the IDE to build multiple projects in parallel. To enable this, go to: Tools -> Options -> Projects and Solutions -> Build and Run: and set the maximum number of parallel project builds. When building a solution from the command line, pass this option to MSBuild: /maxcpucount[:n]. This can be useful, if your solution consists of many small, independent projects. If your solution contains just a single or a couple of big projects, you’ll probably do best with the /MP option only.

Setting maximum number of parallel builds.

In closing

Modern machines come with a lot of horsepower, the trend is that the number of CPU cores will be increasing. Why not leverage this and turn your workspace builds from a lunch break into “only” a coffee break? Parallel compilation speeds up the build process almost linearly with the number of CPU cores.

However compilation is only one part of the story. Then there’s linking. It is not uncommon that a project, which compiles in seconds, takes minutes to link. I will point you to some articles on how to speed up linking in my next post.

Quick Open File, now available for VS 2010 Beta 2

Those of you who embarked on the Visual Studio 2010 Beta 2 train, surely miss my Quick Open File plugin :) Well, good news for you: here it is.

It was not as straightforward to port it over to VS 2010 as I first thought it would be. The new VS IDE is now WPF based, but my plugin is Forms-based. The experience could be best described as a half-day trial and error, struggling to implement undocumented interfaces. Well, I guess that’s part of the beta experience…

Anyway, here it is and I hope you’ll like it. You can get the plugin at Visual Studio Gallery or at my site. Or better yet, open Visual Studio, go to Extension Manager, click at Online Gallery and type “Quick Open File” to the search box. This way you can install it directly from the IDE.

Quick Open File for Visual Studio – minor update

I found out that people come to my homepage mainly to download the Quick Open File for Visual Studio 2008 plugin. In fact there have been over 700 downloads since April-2009, when I first released it. This makes me quite happy because I’ve finally created something people find useful :)

As the name suggests, it’s a little utility for Visual Studio 2008 that allows you to find and open any file anywhere in the solution, no matter how deeply buried in the project structure. You just press Ctrl+K, Ctrl+O (of course, you can customize the shortcut key), type a few letters from the file name and hit Enter. And voila, your file is on the screen.

Quick Open File plugin window.

Today I released version 1.1 which adds the option to open the selected file in any other associated editor. The behavior is as follows:

  • Pressing Enter will open the selected file in the default editor Visual Studio has associated with the file type.
  • Pressing Shift+Enter will open the “Open With” dialog first where you can select in which editor to open the file.

You can find the new version of the plugin at Visual Studio Gallery, or directly at my site.